
安装环境 ubuntu16.04 64位
一安装依赖库(mysql数据库 )
注意,记得安装sql时的root用户密码
sudo apt-get install mysql-server libmysqlclient-dev libreadline-dev
二 安装ruby环境
//回到home目录
cd ~
git clone git://github.com/sstephenson/rbenv.git .rbenv
echo 'export PATH="$HOME/.rbenv/bin:$PATH"' >> ~/.bashrc
echo 'eval "$(rbenv init -)"' >> ~/.bashrc
exec $SHELL

git clone git://github.com/sstephenson/ruby-build.git ~/.rbenv/plugins/ruby-build
echo 'export PATH="$HOME/.rbenv/plugins/ruby-build/bin:$PATH"' >> ~/.bashrc
exec $SHELL

git clone https://github.com/sstephenson/rbenv-gem-rehash.git ~/.rbenv/plugins/rbenv-gem-rehash

sudo rbenv install 2.2.3
sudo rbenv global 2.2.3
sudo gem install bundler
三下载水龙头代码
git clone https://github.com/bitshares/faucet
cd faucet
sudo bundle   # ignore warnings
四 配置水龙头文件
(1)水龙头访问配置faucet.yml
cp config/faucet-example.yml config/faucet.yml
vim config/faucet.yml

》》内容如下
cli_wallet_connection: ws://127.0.0.1:8099   //钱包开放的websocketurl,cli_wallet -r参数对应  ./cli_wallet --chain-id="a35368851451335a25ea894c9bf81831c4e7c39e56ce94700a7813700cadf701" -s ws://127.0.0.1:8090 -w wallet.json -r 127.0.0.1:8099   -H 127.0.0.1:8092
registrar_account: nathan                    //提供注册的推荐人用户名,本例子为在比特股环境搭建》已创建且升级为会员的用户名nathan
referrer_percent: 50
refcode_prefix: F01

default_url: 127.0.0.1                       //水龙头对外访问的IP
default_port: 3000                           //水龙头对外访问的端口

exception_notification:
  sender_address: faucet@example.com
  exception_recipients: admin@example.com

smtp:
  address: address
  user_name: user
  password: password
(2)密码种子文件secrets.yml(ruby on rails用到的密码种子配置文件)
cp config/secrets-example.yml config/secrets.yml
rake secret
vim config/secrets.yml
》》内容如下 (按需要改各个清空的密码种子)
development:
  secret_key_base: abcdefg123456

test:
  secret_key_base: abcdefg123456

# Do not keep production secrets in the repository,
# instead read values from the environment.
production:
  secret_key_base: abcdefg123456
(3)数据库配置
vim config/database.yml

》》内容如下
default: &default
  adapter: mysql2
  encoding: utf8
  pool: 5
  username: root           #数据库登录用户名
  password:                #数据库登录密码,根据安装mysql时的填写
  host: localhost          #数据库url

development:
  <<: *default
  database: bitshares_faucet_dev

test:
  <<: *default
  database: bitshares_faucet_test

production:
  <<: *default
  database: bitshares_faucet
五 创建并初始化数据库
rake db:create; rake db:migrate; rake db:seed
RAILS_ENV=production bundle exec rake db:create db:schema:load
六 运行水龙头服务 (-b 0.0.0.0 -b,bind之意。是让本机以外的主机,能够访问水龙头服务)
rails s -b 0.0.0.0

七 联合调试
1 创建创世状态json
./witness_node --create-genesis-json "genesis.json"
2 启动witness_node
./witness_node --rpc-endpoint "127.0.0.1:8090" --enable-stale-production -d test_net --seed-nodes "[]" --genesis-json "genesis.json"
3 启动cli_wallet(如果报chain-id出错,则替换提示的chain-id)
./cli_wallet --chain-id="a35368851451335a25ea894c9bf81831c4e7c39e56ce94700a7813700cadf701" -s ws://127.0.0.1:8090 -w wallet.json -r 127.0.0.1:8099 -H 127.0.0.1:8092
4 启动网页钱包服务
4.1 修改网页钱包的配置文件,配置默认水龙头地址,默认p2p网络的地址
/bitshares-ui/app/api/apiConfig.js
》》内容如下
export const blockTradesAPIs = {
    BASE: "https://api.blocktrades.us/v2",
    // BASE_OL: "https://api.blocktrades.us/ol/v2",
    BASE_OL: "https://ol-api1.openledger.info/api/v0/ol/support",
    COINS_LIST: "/coins",
    ACTIVE_WALLETS: "/active-wallets",
    TRADING_PAIRS: "/trading-pairs",
    DEPOSIT_LIMIT: "/deposit-limits",
    ESTIMATE_OUTPUT: "/estimate-output-amount"
};

export const settingsAPIs = {
    DEFAULT_WS_NODE: "ws://127.0.0.1:8090",               //默认witness_node节点网络地址
    WS_NODE_LIST: [
        {url: "ws://127.0.0.1:8090", location: "My hosted"}//本地witness_node节点网络地址
    ],
    DEFAULT_FAUCET: "http://127.0.0.1:3000",            //默认水龙头地址
    RPC_URL: "http://127.0.0.1:8092"                                //推测是钱包api服务地址,测试中暂时未用到
};
4.2 启动网页钱包
npm start
4.3 浏览器打开127.0.0.1:8080
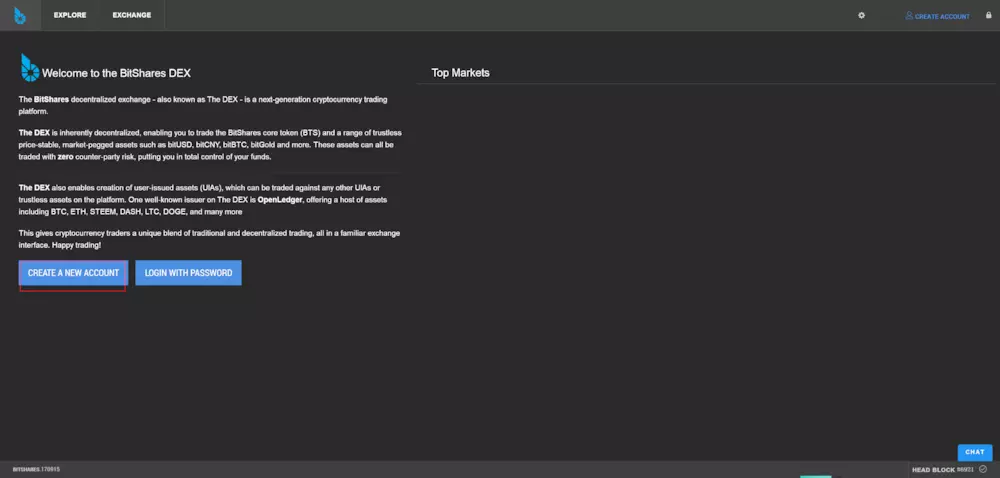
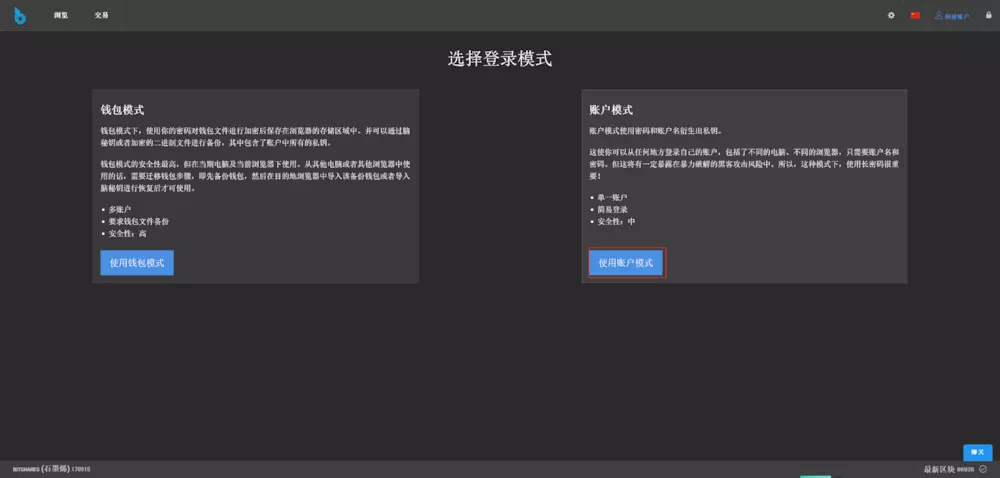
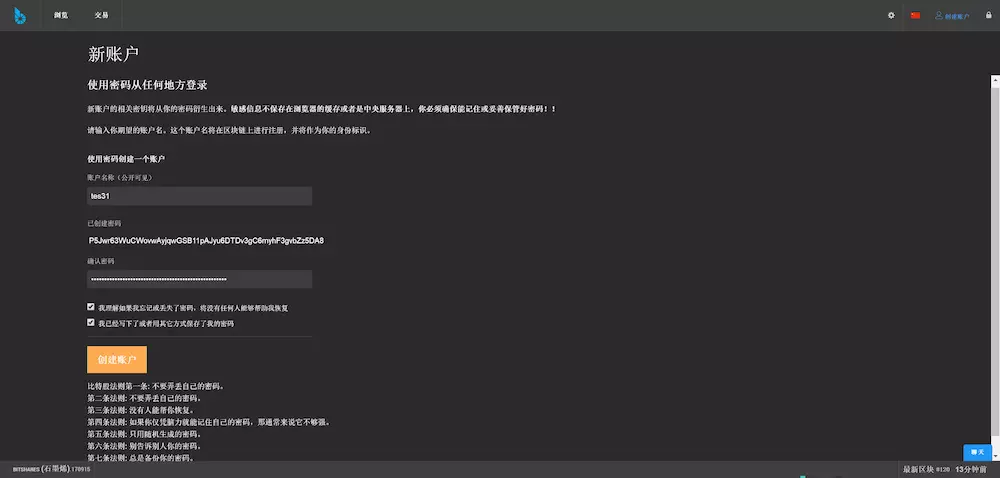
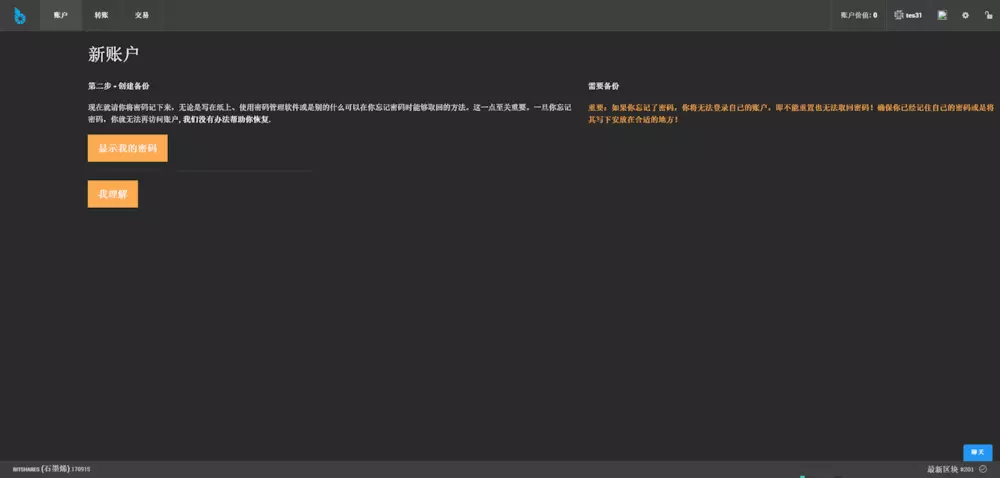
5 注册(用账户模式测试)
注意:此时的cli_wallet命令行,
5.1 必须是unlock状态(否则注册报Failed to create account: tes32 - Assert Exception: !self.is_locked()
5.2 nathan账户存在,且已升级为会员。
5.3 nathan账户有很多余额

注册成功的后台打印
八 遇到的问题
1 配置水龙头服务时,生成密码种子命令rake secret报错
$rake secret报错
 Could not find a JavaScript runtime. See https://github.com/rails/execjs for a list of available runtimes.,因为没nodejs环境
=>安装nodejs
curl -o- https://raw.githubusercontent.com/creationix/nvm/v0.30.2/install.sh | bash
nvm install v6
nvm use v6
2 执行rake db:create; rake db:migrate; rake db:seed报错,因root用户在localhost被禁用
ERROR 1698 (28000): Access denied for user ‘root’@‘localhost’
=>
$ sudo mysql -u root # I had to use "sudo" since is new installation
mysql> USE mysql;
mysql> UPDATE user SET plugin='mysql_native_password' WHERE User='root';
mysql> FLUSH PRIVILEGES;
mysql> exit;
3 Failed to create account: tes32 - Assert Exception: !self.is_locked():
=》
进入cli_wallet命令模式(my_password 是set_password my_password设置的密码)
locked >>> unlock my_password
4 运行witness_node 一天后,发现无法产生块
2994239ms thread-0 producer_plugin.cpp:210 block_production_loo ] initk generated block #202 @ 2017-09-11T06:49:54 with 0 trxs 0 pending
2998489ms thread-0 producer_plugin.cpp:229 block_production_loo ] Not producing block because node didn't wake up within 500ms of the slot time.
3000615ms thread-0 producer_plugin.cpp:229 block_production_loo ] Not producing block because node didn't wake up within 500ms of the slot time.
3002818ms thread-0 chain_controller.cpp:235 _push_block ] inith #203 @2017-09-11t06:50:03 | 0 trx, 0 pending, exectime_ms=13
=>
BM说,生成一个大区块是阻塞了,没说解决方法。以下是原文
This is an indication that the single CPU is getting backlogged by a large blocking task that is not properly timebound… eg, block generation with a large pending set. (https://github.com/EOSIO/eos/issues/397)
5 注意,witness_node, cli_wallet,faucet配置的IP为127.0.0.1,则服务只能本机访问。如需要本机外的机器能访问,把127.0.0.1设置为本机的局域网IP或公网IP。
6 注册时,水龙头后台服务报异常Failed to create account: tes2 - Assert Exception: base58str.substr( 0, prefix_len ) == prefix
!!! register_account error: {"code"=>1, "message"=>"Assert Exception: base58str.substr( 0, prefix_len ) == prefix: ", "data"=>{"code"=>10, "name"=>"assert_exception", "message"=>"Assert Exception", "stack"=>[{"context"=>{"level"=>"error", "file"=>"types.cpp", "line"=>60, "method"=>"public_key_type", "hostname"=>"", "thread_name"=>"th_a", "timestamp"=>"2017-09-23T06:47:58"}, "format"=>"base58str.substr( 0, prefix_len ) == prefix: ", "data"=>{"base58str"=>"GPH5jNZn4sB7t3sBDcX3NFdx2BLEh3WA15SLmoG71dHCoLs1iTZwH"}}, {"context"=>{"level"=>"warn", "file"=>"websocket_api.cpp", "line"=>122, "method"=>"on_message", "hostname"=>"", "thread_name"=>"th_a", "timestamp"=>"2017-09-23T06:47:58"}, "format"=>"", "data"=>{"call.method"=>"call", "call.params"=>[0, "register_account", ["tes2", "GPH5jNZn4sB7t3sBDcX3NFdx2BLEh3WA15SLmoG71dHCoLs1iTZwH", "GPH5fMdwtVVKGvyawZwEBTBnftbovvNdJg1Q34BMpXPWggXtEKrbv", "nathan", "nathan", 0, true]]}}]}}
=》
因为网页钱包生成的公钥的地址前缀(GPH)和比特股源码的前缀(BTS)不对应。目前采用方法(2),原因是试错先试了这方法(2)。方法(1)未验证.
推测可行修改方式
(1)网页钱包bitshares-core的公钥前缀生成,是在bitsharesjs库里提供的。这里说可以把公钥前缀修改下。(https://blog.xiaofuxing.name/2017/04/18/ecc_in_nodejs_introduction.html)
const bitsharesjsws = require('bitsharesjs-ws');
 bitsharesjsws.ChainConfig.setPrefix('BTS'); //可以手工设定前缀,这样的话可以兼容Steem区块链。

bitsharesjs库公钥前缀源码见
node_modules>bitsharesjs>cjs>src>ChainConfig.js
"use strict";
exports.__esModule = true;
var _this = void 0;
var ecc_config = {
    address_prefix: process.env.npm_config__graphene_ecc_default_address_prefix || "GPH"
};
_this = {
    core_asset: "CORE",
    address_prefix: "GPH",
    expire_in_secs: 15,
    expire_in_secs_proposal: 24 * 60 * 60,
    review_in_secs_committee: 24 * 60 * 60,
    networks: {
        BitShares: {
            core_asset: "BTS",
            address_prefix: "BTS",
            chain_id: "4018d7844c78f6a6c41c6a552b898022310fc5dec06da467ee7905a8dad512c8"
        },
        Muse: {
            core_asset: "MUSE",
            address_prefix: "MUSE",
            chain_id: "45ad2d3f9ef92a49b55c2227eb06123f613bb35dd08bd876f2aea21925a67a67"
        },
        Test: {
            core_asset: "TEST",
            address_prefix: "TEST",
            chain_id: "39f5e2ede1f8bc1a3a54a7914414e3779e33193f1f5693510e73cb7a87617447"
        },
        Obelisk: {
            core_asset: "GOV",
            address_prefix: "FEW",
            chain_id: "1cfde7c388b9e8ac06462d68aadbd966b58f88797637d9af805b4560b0e9661e"
        }
    },
(2)改bitshares-core源码的公钥前缀为GPH重新编译,且修改所有公钥前缀为GPH。
修改如下
(2.1)修改源码
(2.1.1) 源码/bitshares-core/libraries/chain/include/graphene/chain/config.hpp
#define GRAPHENE_SYMBOL "BTS"
#define GRAPHENE_ADDRESS_PREFIX "BTS"
=>
#define GRAPHENE_SYMBOL "GPH"
#define GRAPHENE_ADDRESS_PREFIX "GPH"

(2.1.2)源码/bitshares-core/libraries/chain/protocol/types.cpp 搜索多处"BTS"
std::string( "BTS" );
=>
std::string( "GPH" );

(2.1.3)源码bitshares-core/libraries/chain/db_init.cpp
    if( symbol == "BTS" )
=>
    if( symbol == "GPH" )

(2.1.4) 修改 bitshares-core/genesis.json ,替换多处
"BTS
=》
"GPH
然后重新编译bitshares-core

(2.2)修改witness_node启动创世块状态文件genesis.json,替换多处
"BTS
=》
"GPH

(2.3)修改witness_node启动参数文件,比特股参数文件 config.ini,替换多处
"BTS
=》
"GPH
九 引用
http://docs.bitshares.org/testnet/7-faucet.html 《Setting up the Faucet》